


To plant potatoes by hand, prepare healthy seed tubers, mark straight rows in workable soil, place each tuber without damaging its sprouts and cover it to a depth suited to the site. Decide the spacing and fertilizer method before opening the first hole. This makes the work more consistent and helps you avoid changing the planting pattern halfway across the bed.
Start with the site and the seed potatoes
Choose an open, sunny part of the vegetable garden and consider what grew there previously. Repeated potato growing in the same place encourages a build-up of soil problems. A small garden still benefits from planning crop positions, even when a complete field rotation is impractical. Mark the previous potato area on your own garden plan before choosing the next bed, and inspect the site for persistent wet patches.
Buy seed potatoes from a reliable supplier with an identifiable variety and documented planting quality. Eating potatoes left in the kitchen are not an equivalent purchase just because they have sprouted. Inspect the seed tubers again before planting and reject rotten, badly damaged or visibly diseased material. Keep different varieties separate throughout preparation so their growth and eventual harvest can be assessed sensibly.
Sort very different tuber sizes into separate groups. Size, variety and growing conditions influence the eventual planting density, so a mixed bucket makes consistent planning harder. For a straightforward first planting, choose suitable whole seed tubers. Cutting larger potatoes introduces a separate task involving wound management and hygiene; it should not become an improvised way to fill the last few holes.
Prepare sprouts without making them fragile
Pre-sprouting can be useful for early potatoes, but it is not a requirement for every crop. Keep tubers in a bright, frost-free place, supported so that developing shoots are not crushed. Check their condition as planting approaches. Move trays carefully and carry only the quantity you can handle comfortably at the bed. Long, tangled shoots are harder to protect than compact growth.
When planting a sprouted tuber, orient the sprouts upwards and lower it gently into position. Do not throw tubers down a trench or pull them from a tangled pile by the shoots. If a batch arrives damaged or with questionable growth, assess that material before planning a larger planting. Extra fertilizer does not replace sound seed potatoes or restore a broken sprout immediately.
Work the soil when it is ready
The planting date is covered separately in when to plant potatoes. Here the practical question is whether the bed can be worked into a suitable structure. Cold, wet soil is a poor starting point. Check below the dry-looking surface: the layer where the tubers will sit should not be saturated or turn into a sticky mass under the spade.
Break up large clods, remove persistent weeds and prepare enough loose soil to cover the tubers. Avoid trampling the opened planting line. Keep a walking route beside the work, especially if two people are planting together. One person can open and measure the positions while the other places tubers, but both should agree on the same depth and spacing before starting.
In Ukraine, a moisture-retaining flat planting on a light, dry site and a ridge system on a wetter site are different decisions. Do not copy the shape of a neighbouring field without considering your soil and available watering. A ridge does not remove the need to understand drainage. Before deciding on amendments or feeding, use the guide to assessing garden soil to organise the relevant checks.
Mark spacing and measure the soil cover
Use a string line and a measuring stick rather than estimating every interval with a footstep. Allow enough room between rows for later weeding and earthing up. Ukrainian field guidance includes 70 cm row spacing with 30-35 cm between tubers in less well-watered conditions, and closer arrangements where moisture and fertility support them. Treat these as qualified starting examples; seed size, variety and local water availability still decide the final layout.
Depth needs an equally clear reference point. The thickness of soil above a tuber is not the same as the depth of an empty hole. A large tuber occupies more of that hole than a small one. After covering the first few positions, check the actual cover before repeating the method across the whole plot. Keep comparable tubers at a consistent depth within the same soil conditions.
| Situation | Reference to consider |
|---|---|
| Sandy loam sod-podzolic soil with ridge planting | 8-10 cm from the ridge top to the tuber surface. |
| Forest-Steppe chernozem | A 6-8 cm planting-depth reference, assessed against the actual soil and planting system. |
| Spring planting in dry southern conditions | An 8-10 cm reference; do not apply it automatically to wet, heavy ground. |
These are not instructions to dig every Ukrainian potato bed to one depth. A compact, wet patch and a loose, drying edge need assessment before the same method is extended across both. Check the seed supplier's guidance for the variety and choose a system you can maintain during the season.
Place and cover the tubers in a steady sequence
- Mark the bed boundaries, walking space and first row.
- Open holes or a trench to the chosen depth.
- Complete the selected fertilizer operation according to its own instructions.
- Place healthy tubers at the measured intervals, protecting sprouts.
- Cover with workable soil and check the resulting depth.
- Label the variety and leave a clear route for subsequent care.
Work in manageable sections so that the last part of the bed receives the same attention as the first. If the weather changes or the soil becomes difficult to handle, stop and reassess. Finishing a bag of seed potatoes is not a reason to squeeze the remaining tubers into an already filled row. Keep the planting pattern visible until all rows are complete.
Choose one fertilizer application method
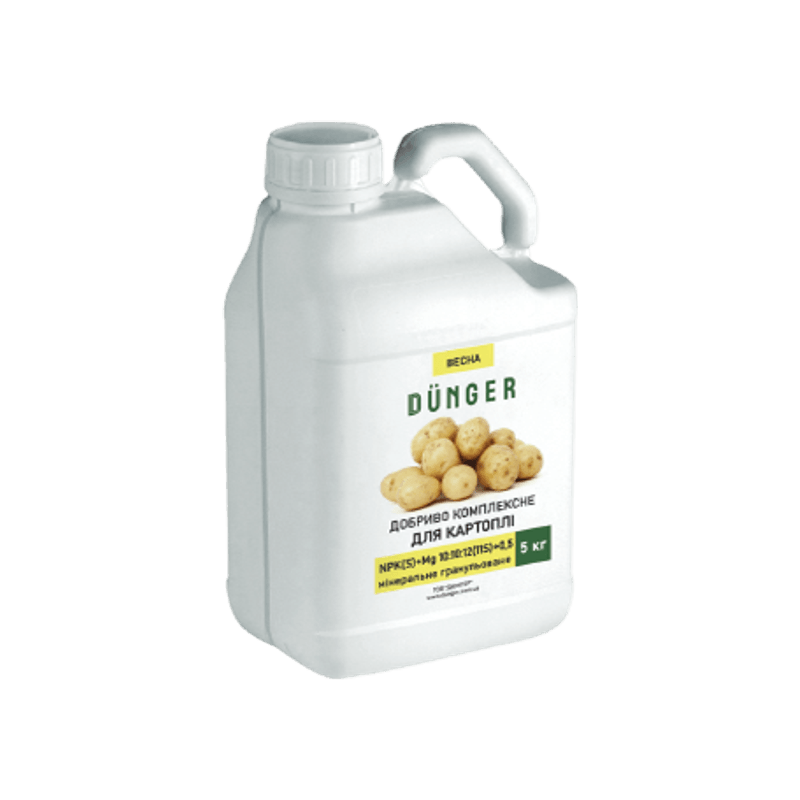
Complex fertilizer for potatoes granular
This granular potato fertilizer comes in a 5 kg pack. Its instructions distinguish application over an area from application in planting holes. Choose the appropriate method and measure the corresponding area or hole count before buying or applying it.
Apply fertilizer before sowing, as well as for fertilization. The complex is evenly distributed on the surface of well-loosened soil, make a scattering on the site at a rate of 20-30 g / m2 or in planting holes (3-5 g / hole ~ 1 teaspoon), taking into account the size and depth.
The alternatives in this instruction are not a reason to add both full quantities to the same planting. Do not convert a teaspoon approximation into a different household scoop. Use a suitable weighing method and keep the original instructions available. Compare products in potato fertilizers, and save the zone, crop, measurements and selected product plan in My Garden.
Care starts before the first shoots appear
Inspect the bed after heavy rain and check soil moisture during dry weather. Remove weeds while access is easy, taking care around the planted positions. As the plants develop, earthing up keeps forming tubers covered from light. Watch the local frost forecast when shoots emerge, because exposed young growth can be damaged. The next task follows weather and plant development, not a fixed number of days after planting.
Frequently asked questions
Both can work. Choose the method that lets you maintain the intended depth and spacing in your soil. A trench makes the line visible; separate holes may suit a small irregular bed. Consistent placement matters more than copying another gardener's tool choice.
Only follow the selected product's approved hole method and its stated conditions. Household scoops vary. If you choose area application instead, measure that area and calculate for that method. Do not add a second dose simply because a hole is now open.
Do not change the spacing halfway through the bed merely to empty a bag. Recheck the available area, seed size and variety. It is easier to adjust the plan before planting than to correct a crowded row after the shoots appear.
Find related seasonal tasks in Vegetables and greenhouse.


